The Gemini API supports prompting with text, image, and audio data, also known as multimodal prompting. You can include text, image, and audio in your prompts. For small images, you can point the Gemini model directly to a local file when providing a prompt. For larger text files, images, videos, and audio, upload the files with the File API before including them in prompts.
The File API lets you store up to 20GB of files per project, with each file not exceeding 2GB in size. Files are stored for 48 hours and can be accessed with your API key for generation within that time period. It is available at no cost in all regions where the Gemini API is available.
For information on valid file formats (MIME types) and supported models, see the documentation on supported file formats and view the text examples at the end of this guide.
This guide shows how to use the File API to upload a media file and include it in a generateContent call to the Gemini API. For more information, see the code samples.
You can create your API key using Google AI Studio with a single click.
Remember to treat your API key like a password. Don’t accidentally save it in a notebook or source file you later commit to GitHub. In this notebook we will be storing the API key in a .env file. You can also set it as an environment variable or use a secret manager.
The File API uses API keys for authentication and access. Uploaded files are associated with the API key’s cloud project. Unlike other Gemini APIs that use API keys, your API key also grants access data you’ve uploaded to the File API, so take extra care in keeping your API key secure. For best practices on securing API keys, refer to Google’s documentation.
Tip
Another option is to set the API key as an environment variable. You can do this in your terminal with the following command:
$ export GEMINI_API_KEY="<YOUR_API_KEY>"
Load the API key
To load the API key from the .env file, we will use the dotenv package. This package loads environment variables from a .env file into process.env.
$ npm install dotenv
Then, we can load the API key in our code:
const dotenv =require("dotenv") astypeofimport("dotenv");dotenv.config({ path:"../.env",});const GEMINI_API_KEY =process.env.GEMINI_API_KEY??"";if (!GEMINI_API_KEY) {thrownewError("GEMINI_API_KEY is not set in the environment variables");}console.log("GEMINI_API_KEY is set in the environment variables");
GEMINI_API_KEY is set in the environment variables
Note
In our particular case the .env is is one directory up from the notebook, hence we need to use ../ to go up one directory. If the .env file is in the same directory as the notebook, you can omit it altogether.
│
├── .env
└── quickstarts
    └── File_API.ipynb
Initialize SDK Client
With the new SDK, now you only need to initialize a client with you API key (or OAuth if using Vertex AI). The model is now set in each call.
const google =require("@google/genai") astypeofimport("@google/genai");const ai =new google.GoogleGenAI({ apiKey: GEMINI_API_KEY });
Upload a file
The File API lets you upload a variety of multimodal MIME types, including images and audio formats. The File API handles inputs that can be used to generate content with model.generateContent or model.streamGenerateContent.
The File API accepts files under 2GB in size and can store up to 20GB of files per project. Files last for 2 days and cannot be downloaded from the API.
First, you will prepare a sample image to upload to the API.
The response shows that the File API stored the specified displayName for the uploaded file and a uri to reference the file in Gemini API calls. Use response to track how uploaded files are mapped to URIs.
Depending on your use cases, you could store the URIs in structures such as a dict or a database.
Get a file
After uploading the file, you can verify the API has successfully received the files by calling files.get.
It lets you get the file metadata that have been uploaded to the File API that are associated with the Cloud project your API key belongs to. Only the name (and by extension, the uri) are unique. Only use the displayName to identify files if you manage uniqueness yourself.
After uploading the file, you can make generateContent requests that reference the file by providing the URI. In the JS SDK, you need to construct a Part object that includes the file URI and mime type and then pass it to the generateContent method.
Here you create a prompt that starts with text and includes the uploaded image.
const content_response =await ai.models.generateContent({ model:"gemini-2.5-flash-preview-05-20", contents: ["Describe the image with a creative description.", google.createPartFromUri(retreived_file.uri!, retreived_file.mimeType!), ],});tslab.display.markdown(content_response.text??"");
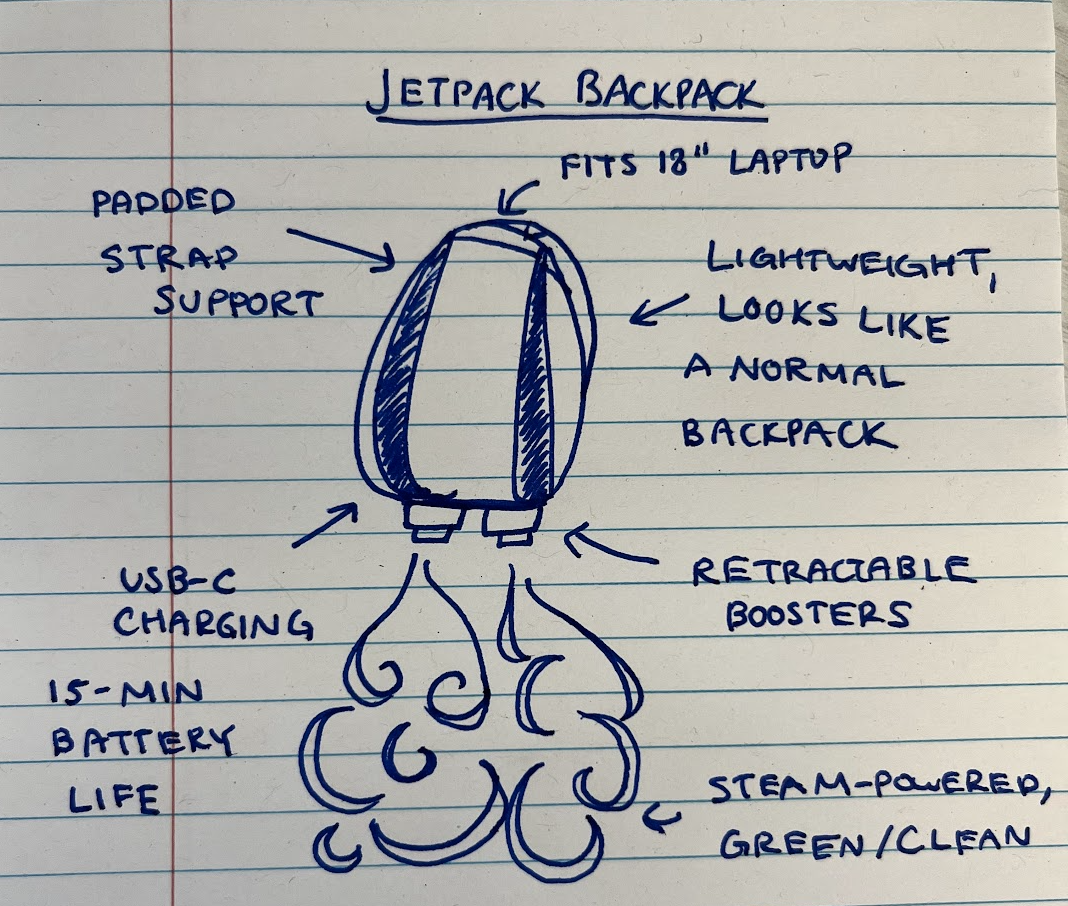
On a classic lined notebook page, a visionary (or perhaps a very enthusiastic student) has penned the blueprint for the ultimate urban escape vehicle: the “JETPACK BACKPACK.” Rendered in crisp blue ink, the drawing features a sleek, almost minimalist backpack design, looking unassuming enough to carry textbooks or gym clothes.
But beneath its innocent exterior, magic awaits. From its base, two stubby, retractable boosters are poised to unleash their power, depicted by playful, swirling plumes of steam that hint at a “green/clean”, eco-friendly propulsion system. The designer promises it’s lightweight, fits an 18-inch laptop, and boasts padded strap support for comfortable ascent.
Yet, a mischievous detail catches the eye: while it proudly features “USB-C CHARGING” for modern convenience, the “15-MIN BATTERY LIFE” suggests that adventures in the sky will be thrillingly brief dashes, perhaps just enough to leapfrog over a traffic jam or make a truly grand entrance (or exit) before gravity reclaims its due. It’s a delightful doodle of daring, a dream of everyday flight captured on paper, proving that sometimes, the most imaginative journeys begin with a pen and a blank page.
Delete files
Files are automatically deleted after 2 days or you can manually delete them using files.delete().
As well as supporting media uploads, the File API can be used to embed text files, such as Python code, or Markdown files, into your prompts.
This example shows you how to load a markdown file into a prompt using the File API.
const MD_URL ="https://raw.githubusercontent.com/google-gemini/cookbook/main/CONTRIBUTING.md";const mdFilePath = path.join("../assets","contrib.md");awaitdownloadFile(MD_URL, mdFilePath);const mdFile =await ai.files.upload({ file: mdFilePath, config: { displayName:"contrib.md", mimeType:"text/markdown", },});const md_content_response =await ai.models.generateContent({ model:"gemini-2.5-flash-preview-05-20", contents: ["What should I do before I start writing, when following these guidelines?", google.createPartFromUri(mdFile.uri!, mdFile.mimeType!), ],});tslab.display.markdown(md_content_response.text??"");
Before you start writing a contribution to the Gemini API Cookbook, you should do the following:
This gives Google permission to use and redistribute your contributions. (Check if you or your employer have already signed a Google CLA for another project, as you likely won’t need to do it again.)
Check the relevant style guide for the programming language you will be using (e.g., Python).
(For Python notebooks specifically): Consider running pyink over your notebook, as it helps with style consistency (though not strictly required before starting, it’s good to keep in mind).
File an Issue:
Before writing a single line or sending a pull request, file an issue on the GitHub repository.
This step is crucial for discussing your idea, getting guidance, and ensuring your content has full support before you invest time in writing it.
Some common text formats are automatically detected, such as text/x-python, text/html and text/markdown. If you are using a file that you know is text, but is not automatically detected by the API as such, you can specify the MIME type as text/plain explicitly.
const CODE_URL ="https://raw.githubusercontent.com/google/gemma.cpp/main/../examples/hello_world/run.cc";const codeFilePath = path.join("../assets","gemma.cpp");awaitdownloadFile(CODE_URL, codeFilePath);const codeFile =await ai.files.upload({ file: codeFilePath, config: { displayName:"gemma.cpp", mimeType:"text/plain", },});const code_content_response =await ai.models.generateContent({ model:"gemini-2.5-flash-preview-05-20", contents: ["What does this program do?", google.createPartFromUri(codeFile.uri!, codeFile.mimeType!)],});tslab.display.markdown(code_content_response.text??"");
This C++ program is a demonstration of how to run the Gemma large language model for text generation, specifically highlighting a “constrained decoding” feature.
Here’s a breakdown of what it does:
Initialization and Argument Parsing:
It starts by parsing command-line arguments using gcpp::LoaderArgs, gcpp::InferenceArgs, and gcpp::AppArgs. These arguments likely configure how the Gemma model is loaded (e.g., model path, precision) and how inference is performed (e.g., batch size).
It supports a --help flag for displaying usage information.
Constrained Decoding (Token Rejection):
This is a key feature demonstrated in this specific example. It iterates through command-line arguments to find --reject. Any subsequent numeric arguments after --reject are treated as token IDs to be excluded from generation. These “rejected” tokens are stored in a std::set<int>.
This allows the user to specify tokens that the model must not output during the generation process.
Gemma Model Setup:
It initializes the gcpp::Gemma model, which is the core large language model. This involves setting up the model’s topology, pools (likely for thread management and parallel computation, given the hwy and thread_pool includes), and MatMulEnv (matrix multiplication environment).
A gcpp::KVCache is also created, which is essential for efficient sequence generation in transformer models.
Prompt Definition and Tokenization:
The program defines a hardcoded prompt: "Write a greeting to the world."
This prompt is then converted into a sequence of integer tokens using the model’s Tokenizer().
Text Generation and Output:
It sets up a std::mt19937 random number generator, seeded by std::random_device, which is used for sampling tokens during generation (e.g., when temperature is applied).
stream_token Callback: A lambda function stream_token is defined. This function is called every time the model generates a new token. It decodes the token back into readable text and prints it to std::cout, giving a real-time streaming output experience.
accept_token Callback (Constrained Decoding in action): A crucial part of runtime_config is the accept_token lambda. This function takes a candidate token and returns true if it’s allowed, false if it should be rejected. In this program, it checks if the candidate token is present in the reject_tokens set. If it is, false is returned, preventing the model from outputting that specific token.
Finally, it calls model.Generate() with the prepared runtime_config, the tokenized prompt, the KV cache, and other parameters. The model then generates text based on the prompt, adhering to the specified constraints (like max_generated_tokens, temperature, and the accept_token filter).
In essence, this program demonstrates a basic text generation pipeline with the Gemma model, with a specific focus on showing how to implement constrained decoding by preventing the model from generating certain specified tokens. It’s a command-line application that will print the generated text to standard output.
Example Usage (Hypothetical):
# Basic run, model will generate freely./gemma_example--model=/path/to/gemma.ckpt# Run and prevent the model from generating tokens 123, 456, and 789./gemma_example--model=/path/to/gemma.ckpt --reject 123 456 789
Next Steps
Useful API references:
For more information about the File API, check its API reference.
Related examples
Check those examples using the File API to give you more ideas on how to use that very useful feature:
Share Voice memos with Gemini API and brainstorm ideas
If you’re not already familiar with it, learn how tokens are counted. Then check how to use the File API to use Audio or Video files with the Gemini API.