In this notebook you will learn how to use the new Google Search tool available in Gemini, using both the unary API and the Multimodal Live API. Check out the docs to learn more about using Search as a tool.
You can create your API key using Google AI Studio with a single click.
Remember to treat your API key like a password. Don’t accidentally save it in a notebook or source file you later commit to GitHub. In this notebook we will be storing the API key in a .env file. You can also set it as an environment variable or use a secret manager.
Another option is to set the API key as an environment variable. You can do this in your terminal with the following command:
$ export GEMINI_API_KEY="<YOUR_API_KEY>"
Load the API key
To load the API key from the .env file, we will use the dotenv package. This package loads environment variables from a .env file into process.env.
$ npm install dotenv
Then, we can load the API key in our code:
const dotenv =require("dotenv") astypeofimport("dotenv");dotenv.config({ path:"../.env",});const GEMINI_API_KEY =process.env.GEMINI_API_KEY??"";if (!GEMINI_API_KEY) {thrownewError("GEMINI_API_KEY is not set in the environment variables");}console.log("GEMINI_API_KEY is set in the environment variables");
GEMINI_API_KEY is set in the environment variables
Note
In our particular case the .env is is one directory up from the notebook, hence we need to use ../ to go up one directory. If the .env file is in the same directory as the notebook, you can omit it altogether.
With the new SDK, now you only need to initialize a client with you API key (or OAuth if using Vertex AI). The model is now set in each call.
const google =require("@google/genai") astypeofimport("@google/genai");const ai =new google.GoogleGenAI({ apiKey: GEMINI_API_KEY });
Select a model
Now select the model you want to use in this guide, either by selecting one in the list or writing it down. Keep in mind that some models, like the 2.5 ones are thinking models and thus take slightly more time to respond (cf. thinking notebook for more details and in particular learn how to switch the thiking off).
Search grounding is particularly useful for queries that require current information or external knowledge. Using Google Search, Gemini can access nearly real-time information and better responses.
const grounded_response =await ai.models.generateContent({ model: MODEL_ID, contents:"What was the latest Indian Premier League match and who won?", config: { tools: [{ googleSearch: {} }], },});tslab.display.markdown(grounded_response.text??"");console.log("Search Query:",JSON.stringify(grounded_response.candidates?.[0]?.groundingMetadata?.webSearchQueries,null,2));console.log("Search Pages:",JSON.stringify(grounded_response.candidates?.[0]?.groundingMetadata?.groundingChunks,null,2));tslab.display.html(grounded_response.candidates?.[0]?.groundingMetadata?.searchEntryPoint?.renderedContent??"");
The latest Indian Premier League (IPL) match was the final of the IPL 2025 season, played on June 3, 2025. In this match, Royal Challengers Bengaluru (RCB) defeated Punjab Kings (PBKS) by 6 runs to win their first-ever IPL title. The final took place at the Narendra Modi Stadium in Ahmedabad.
Search Query: [
  "latest Indian Premier League match",
  "who won the latest IPL match",
  "When was the last IPL match played?",
  "Who won the 2024 IPL final?"
]
Search Pages: [
  {
    "web": {
      "uri": "https://vertexaisearch.cloud.google.com/grounding-api-redirect/AUZIYQED1gBjfQR3VhZnkg_v0aF2J2OUGrGI8O-oemmw9DPSI6P2CdRjxdxCGVXlRbCwaSPYbS5uZCdqhm4ITGpreZyqIOyZjys6VqEKsCsg4LG83stZQnNPG1VYRRUTnl-S8a4sE6-IlKJafsOCEVTuvg==",
      "title": "adda247.com"
    }
  },
  {
    "web": {
      "uri": "https://vertexaisearch.cloud.google.com/grounding-api-redirect/AUZIYQGhicCsA4P1rmWqWXF4jZvyZDKu0McjkXMBMJJsCEZBIqfYrtHbsXh28_y64X1Z9wMO5FzHXkimu1KfFlUgVAqnZA2-ve8vEBqu7SbM_gurW51G8E4UZNfT6PmnIs24c-ChqbA2OEe7ZBTtO9HoswrXjsNTiNcq1jyxjJzItfbdlaSbEReqQ8JvxnQQ_oMiRZg=",
      "title": "jagranjosh.com"
    }
  },
  {
    "web": {
      "uri": "https://vertexaisearch.cloud.google.com/grounding-api-redirect/AUZIYQFMC1rTjxqoJt8Zd6FCbOrfbGAMTRpcPYKrFdmU86xkJVL-ff56NFVrTRgDa0OQeLPF2vAijDHMA3LtJVhKx0Vbdf8q8hV8KbLR7qSaXOLJUkwn7HeVaI00dmLWqzofScElLsrsnpCRKXTsiEr_KTLRpJVuBZ9cwQBA",
      "title": "indiatimes.com"
    }
  },
  {
    "web": {
      "uri": "https://vertexaisearch.cloud.google.com/grounding-api-redirect/AUZIYQGKzBG91vj9P-anoK9ZxvEggSNf4t2wrwaIi2U9K8hD1EFZJIiiL-kIYLdn4X0hwyqHOPZxCHq2omH235vXNu0Wvfmc4ynt8hXybLeGQzcC1hxOwXh_qXlk1um19yw63k1cKTYoV96qyIoVfaD6iGBizSBeM3l3bWYeVRSYiYr81CiIiueK3vMzJ9HBbsoBPKYoWJ7qIB6D5320__FrsQztn6VHopAS8dEVoYXYSZ7N1WZWOjGDsiofV7v70tgMaaQC30ItVmTwJzuGyLnAnoj7K5avn0RVv2BCiiGH07vvKiT0lRL5cfGgDCFAxmTQk65DNUYtfZUx-bpLztQ=",
      "title": "economictimes.com"
    }
  },
  {
    "web": {
      "uri": "https://vertexaisearch.cloud.google.com/grounding-api-redirect/AUZIYQFPb64tb-APO_8I1aarbGeUW2wym9sBVxnGbYn_acSsknsd_tbLU22iIXCtHhQvlsBQKtoMk2M7pKcoFc573pyhqZTaJ0sVcaUrpS-JIhF3oB_kMwzcLpH7eTPuvkX2-bkmzTSUqeIxOG4P5aE9uH4fIJfzO4bTovU=",
      "title": "sportskeeda.com"
    }
  }
]
The information provided may be outdated, as it is based on a knowledge cutoff. For the most current and authoritative details, please refer to the official Model documentation, which includes the latest knowledge cutoff date.
You can see that running the same prompt without search grounding gives you outdated information:
const without_grounding_response =await ai.models.generateContent({ model: MODEL_ID, contents:"What was the latest Indian Premier League match and who won?",});tslab.display.markdown(without_grounding_response.text??"");
The latest Indian Premier League (IPL) match was the Final of the 2024 season.
Match: Kolkata Knight Riders (KKR) vs. Sunrisers Hyderabad (SRH)
Date: May 26, 2024
Venue: M.A. Chidambaram Stadium, Chennai
Winner:Kolkata Knight Riders (KKR) won by 8 wickets.
Use search in chat
Start by defining a helper function that you will use to display each part of the returned response.
First try a query that needs realtime information, so you can see how the model performs without Google Search.
const chat = ai.chats.create({ model: MODEL_ID,});const response_1 =await chat.sendMessage({ message:"Who won the most recent Australia vs Chinese Taipei games?",});showParts(response_1);
Australia won both of the most recent games against Chinese Taipei in men’s football (soccer). These matches were part of the 2026 FIFA World Cup Qualifiers (AFC Second Round).
Here are the results:
November 16, 2023:Australia 7 - 0 Chinese Taipei (Played in Melbourne, Australia)
June 6, 2024:Chinese Taipei 0 - 3 Australia (Played in Taipei, Chinese Taipei)
Australia dominated both matches.
Now set up a new chat session that uses the googleSearch tool. The showParts helper will display the text output as well as any Google Search queries used in the results.
const chat_with_search = ai.chats.create({ model: MODEL_ID, config: { tools: [{ googleSearch: {} }], },});const response_2 =await chat_with_search.sendMessage({ message:"Who won the most recent Australia vs Chinese Taipei games?",});showParts(response_2);
Australia and Chinese Taipei have recently competed in various sports.
In women’s futsal, Chinese Taipei defeated Australia 1-0 on May 10, 2025, in the AFC Women’s Futsal Asian Cup 2025™.
In women’s football (soccer), Australia Women played Chinese Taipei Women in two friendly matches in December 2024. Australia won both games, with scores of 3-1 on December 4, 2024, and 6-0 on December 7, 2024.
In men’s basketball, Australia played Chinese Taipei on February 24, 2022, in a FIBA Asia Qualifier, where Australia won. For youth basketball, Australia U18 defeated Chinese Taipei U18 with a score of 113-48 on September 4, 2024. Additionally, there was a FIBA U17 Women’s Basketball World Cup 2024 game between Australia and Chinese Taipei on July 17, 2024.
In men’s volleyball, Australia defeated Chinese Taipei 3-0 on June 2, 2024.
In recent games between Australia and Chinese Taipei across various sports:
In women’s futsal, Chinese Taipei defeated Australia 1-0 in their most recent match on May 10, 2025, during the AFC Women’s Futsal Asian Cup 2025™.
In women’s football (soccer), Australia won both of their most recent friendly matches against Chinese Taipei in December 2024. Australia secured a 3-1 victory on December 4, 2024, and followed up with a 6-0 win on December 7, 2024.
In men’s basketball, Australia defeated Chinese Taipei on February 24, 2022, in a FIBA Asia Qualifier. In youth basketball, Australia U18 won against Chinese Taipei U18 with a score of 113-48 on September 4, 2024. There was also a FIBA U17 Women’s Basketball World Cup 2024 game between Australia and Chinese Taipei on July 17, 2024.
In men’s volleyball, Australia won against Chinese Taipei with a score of 3-0 on June 2, 2024.
In this example you can see how to use the Google Search tool with code generation in order to plot results.
const movie_chat = ai.chats.create({ model: MODEL_ID, config: { tools: [{ googleSearch: {} }], },});const movie_response =await movie_chat.sendMessage({ message:"Generate some javascript code to plot the runtimes of the 10 more recent Denis Villeneuve movies. Write a server side function that generates the plot image and returns the `Buffer` object (Use quickchart.io).",});showParts(movie_response);
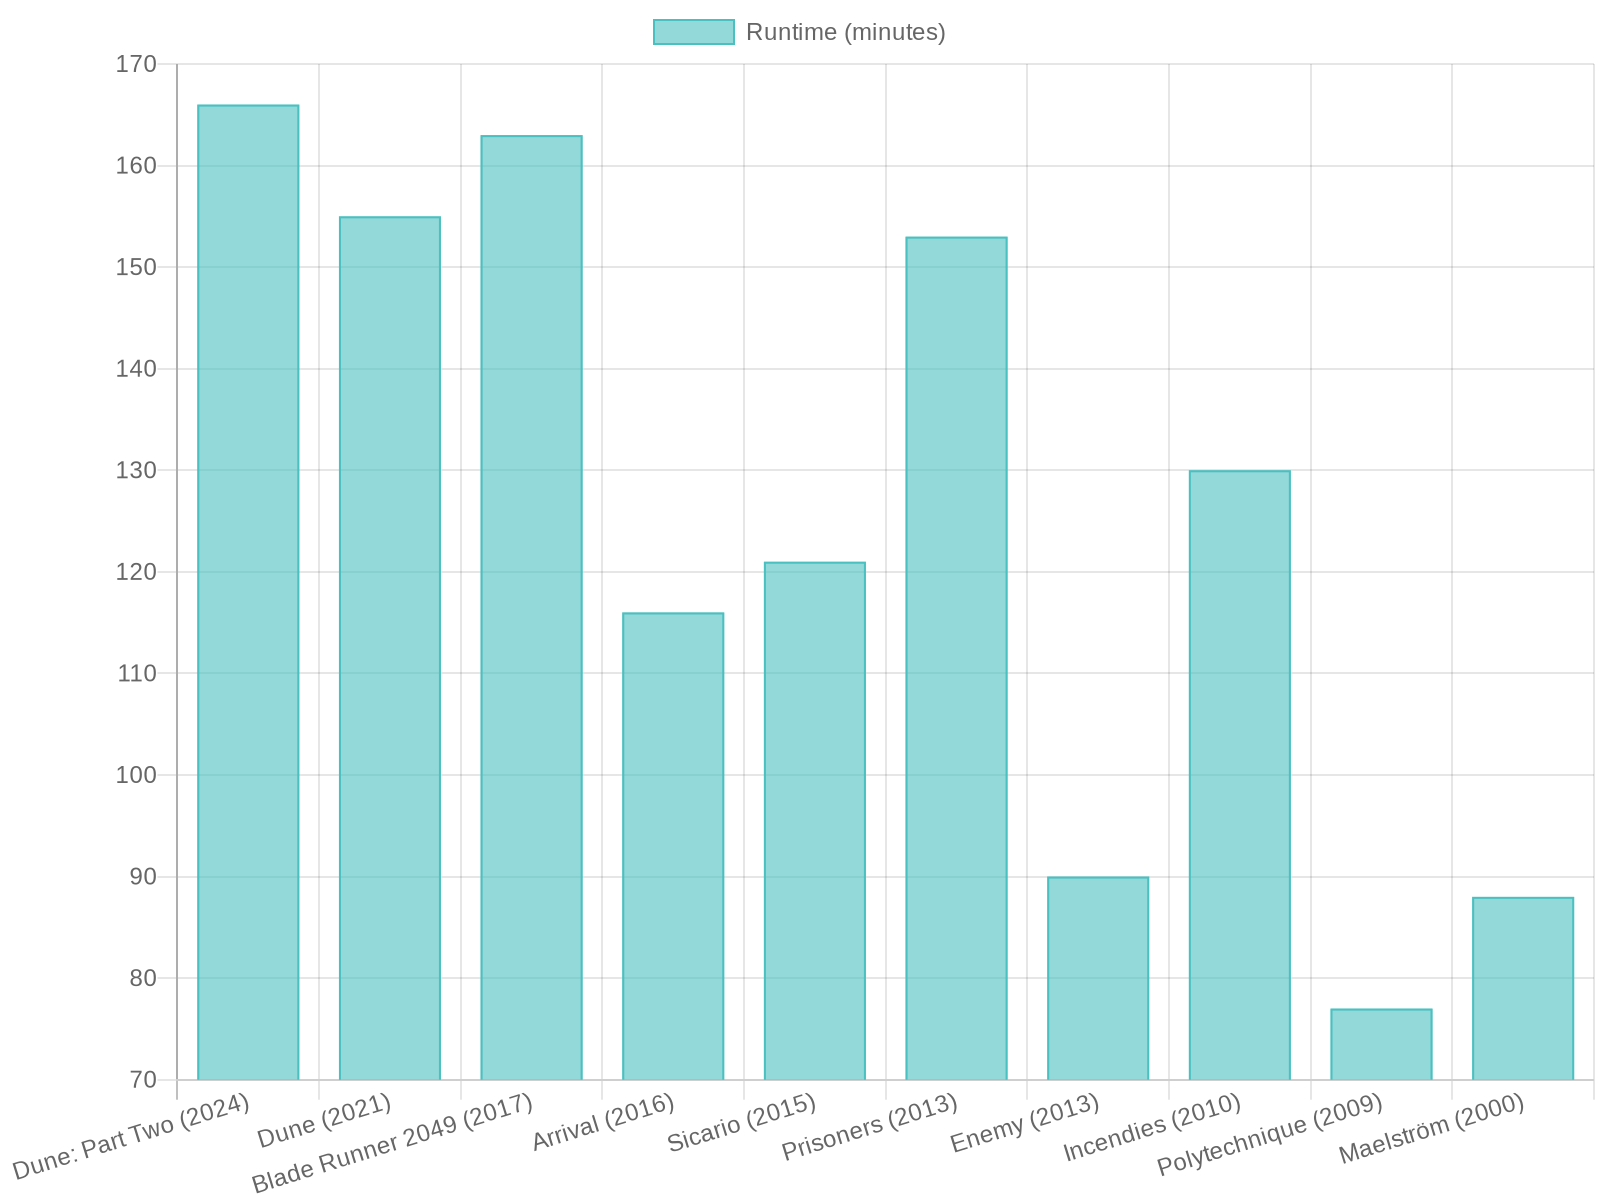
Denis Villeneuve has garnered significant acclaim for his cinematic works, with his more recent films often commanding substantial runtimes. The runtimes of his ten most recent feature films, from newest to oldest, are as follows:
Dune: Part Two (2024): 166 minutes
Dune (2021): 155 minutes
Blade Runner 2049 (2017): 163 minutes
Arrival (2016): 116 minutes
Sicario (2015): 121 minutes
Prisoners (2013): 153 minutes
Enemy (2013): 90 minutes
Incendies (2010): 130 minutes
Polytechnique (2009): 77 minutes
Maelström (2000): 88 minutes
Below is a server-side JavaScript function that generates a plot image of these runtimes using QuickChart.io and returns the image as a Buffer object.
// Ensure you have 'node-fetch' installed: npm install node-fetchconst fetch =require('node-fetch');/** * Generates a bar chart image of Denis Villeneuve's recent movie runtimes * using QuickChart.io and returns it as a Buffer. * * @returns {Promise<Buffer>} A Promise that resolves to a Buffer object * containing the chart image data. */asyncfunctiongenerateVilleneuveRuntimesPlot() {const moviesData = [ { title:'Dune: Part Two (2024)',runtime:166 }, { title:'Dune (2021)',runtime:155 }, { title:'Blade Runner 2049 (2017)',runtime:163 }, { title:'Arrival (2016)',runtime:116 }, { title:'Sicario (2015)',runtime:121 }, { title:'Prisoners (2013)',runtime:153 }, { title:'Enemy (2013)',runtime:90 }, { title:'Incendies (2010)',runtime:130 }, { title:'Polytechnique (2009)',runtime:77 }, { title:'Maelström (2000)',runtime:88 } ];const labels = moviesData.map(movie => movie.title);const data = moviesData.map(movie => movie.runtime);const chartConfig = {type:'bar',data: {labels: labels,datasets: [{label:'Runtime (minutes)',data: data,backgroundColor:'rgba(75, 192, 192, 0.6)',borderColor:'rgba(75, 192, 192, 1)',borderWidth:1 }] },options: {indexAxis:'y',// Makes it a horizontal bar chartresponsive:true,plugins: {title: {display:true,text:'Runtimes of 10 Most Recent Denis Villeneuve Movies',font: {size:20 } },legend: {display:false } },scales: {x: {beginAtZero:true,title: {display:true,text:'Runtime (minutes)' } },y: {title: {display:true,text:'Movie Title' } } } } };const quickChartUrl ='https://quickchart.io/chart';try {const response =awaitfetch(quickChartUrl, {method:'POST',headers: {'Content-Type':'application/json', },body:JSON.stringify({chart: chartConfig,width:800,// Adjust width as neededheight:600,// Adjust height as neededformat:'png',// Add any other QuickChart.io options here }), });if (!response.ok) {thrownewError(`QuickChart.io API error: ${response.statusText}`); }// QuickChart.io returns the image directly in the response bodyconst imageBuffer =await response.buffer();return imageBuffer; } catch (error) {console.error('Error generating chart:', error);throw error;// Re-throw the error for the caller to handle }}// Example usage (for testing purposes, if you run this in a Node.js environment):// (async () => {// try {// const imageBuffer = await generateVilleneuveRuntimesPlot();// require('fs').writeFileSync('villeneuve_runtimes_plot.png', imageBuffer);// console.log('Plot image generated and saved as villeneuve_runtimes_plot.png');// } catch (err) {// console.error('Failed to generate plot:', err);// }// })();
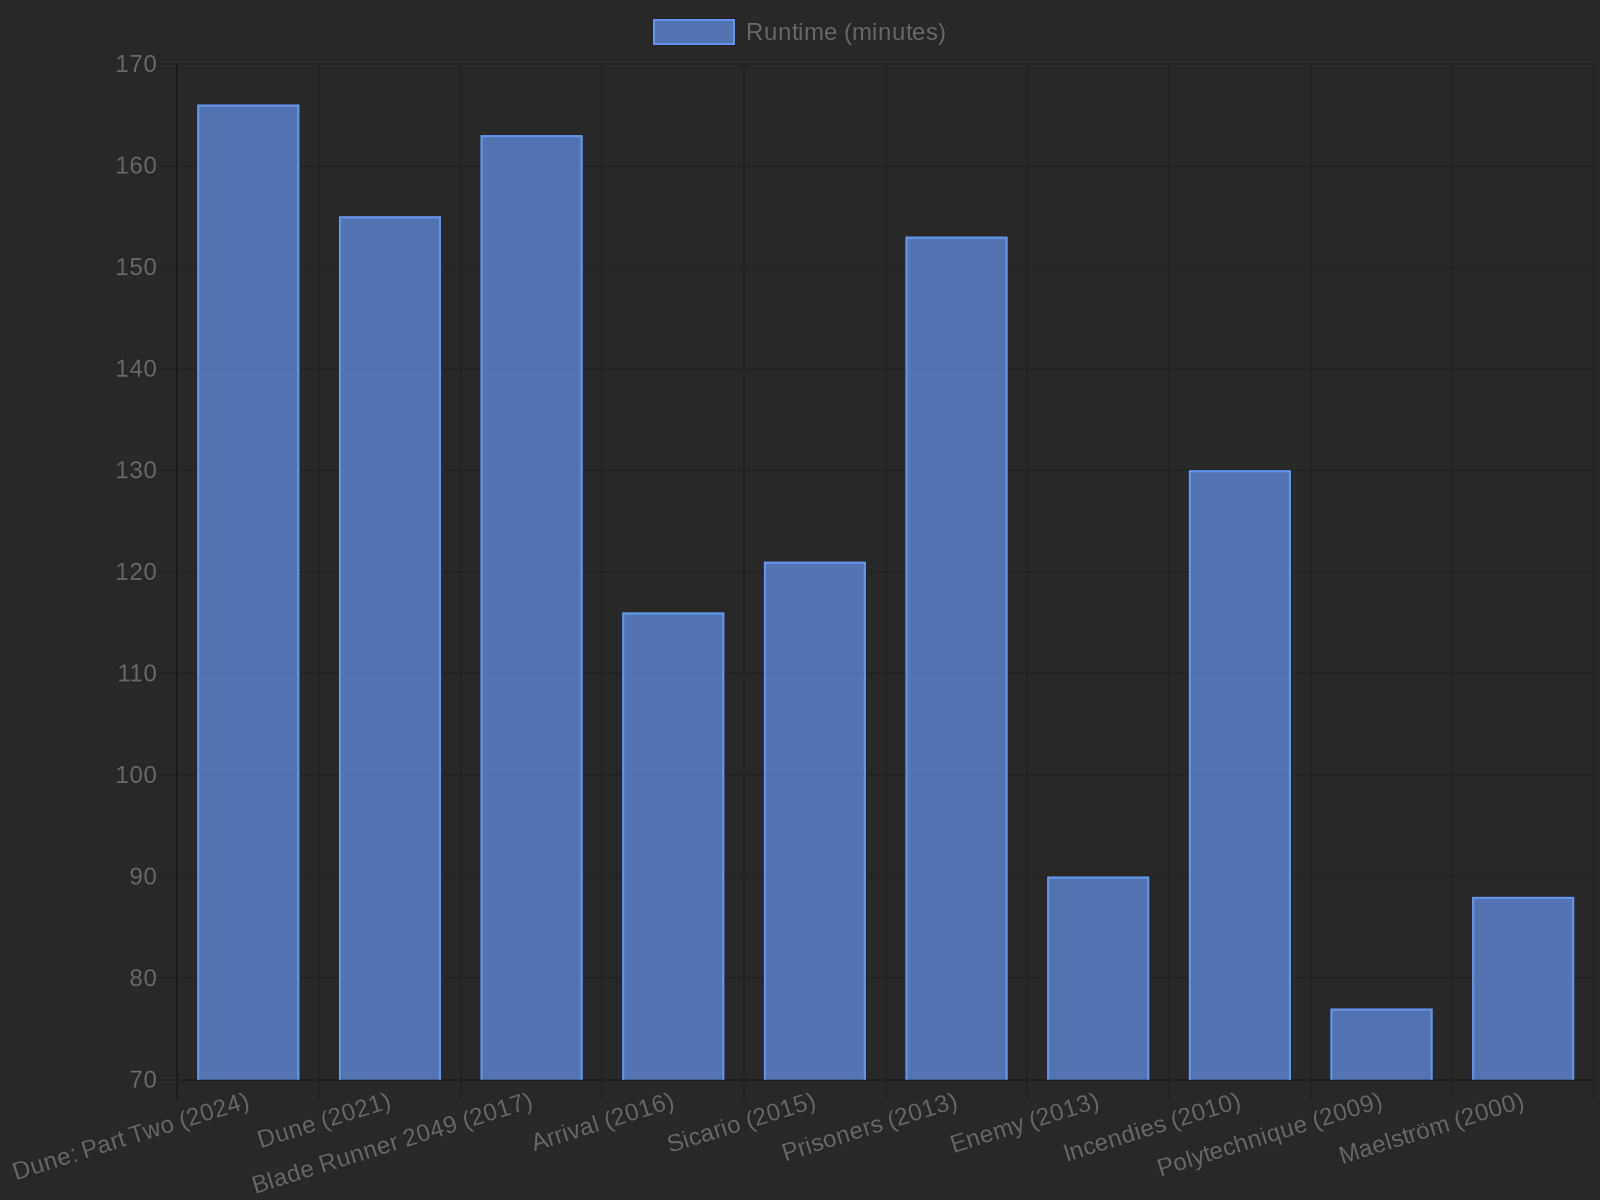
One feature of using a chat conversation to do this is that you can now ask the model to make changes.
const movie_response_1 =await movie_chat.sendMessage({ message:"Looks great! Can you give the chart a dark theme instead?",});showParts(movie_response_1);
To give the chart a dark theme, we need to adjust the colors of various elements within the chartConfig object, including the background, text (title, labels, tick marks), and grid lines.
Here’s the updated JavaScript code for the server-side function:
// Ensure you have 'node-fetch' installed: npm install node-fetchconst fetch =require('node-fetch');/** * Generates a bar chart image of Denis Villeneuve's recent movie runtimes * using QuickChart.io and returns it as a Buffer, with a dark theme. * * @returns {Promise<Buffer>} A Promise that resolves to a Buffer object * containing the chart image data. */asyncfunctiongenerateVilleneuveRuntimesPlotDarkTheme() {const moviesData = [ { title:'Dune: Part Two (2024)',runtime:166 }, { title:'Dune (2021)',runtime:155 }, { title:'Blade Runner 2049 (2017)',runtime:163 }, { title:'Arrival (2016)',runtime:116 }, { title:'Sicario (2015)',runtime:121 }, { title:'Prisoners (2013)',runtime:153 }, { title:'Enemy (2013)',runtime:90 }, { title:'Incendies (2010)',runtime:130 }, { title:'Polytechnique (2009)',runtime:77 }, { title:'Maelström (2000)',runtime:88 } ];const labels = moviesData.map(movie => movie.title);const data = moviesData.map(movie => movie.runtime);const chartConfig = {type:'bar',data: {labels: labels,datasets: [{label:'Runtime (minutes)',data: data,backgroundColor:'rgba(100, 149, 237, 0.7)',// DodgerBlue with transparencyborderColor:'rgba(100, 149, 237, 1)',borderWidth:1 }] },options: {indexAxis:'y',// Makes it a horizontal bar chartresponsive:true,// Global font color for the entire chart (titles, labels, ticks)color:'#E0E0E0',// Light grey for all text [1]plugins: {title: {display:true,text:'Runtimes of 10 Most Recent Denis Villeneuve Movies',font: {size:20,color:'#FFFFFF'// White title [1] } },legend: {display:false } },scales: {x: {beginAtZero:true,title: {display:true,text:'Runtime (minutes)',color:'#E0E0E0'// Light grey axis title },ticks: {color:'#E0E0E0'// Light grey tick labels },grid: {color:'rgba(200, 200, 200, 0.2)'// Subtle light grey grid lines [5, 7] } },y: {title: {display:true,text:'Movie Title',color:'#E0E0E0'// Light grey axis title },ticks: {color:'#E0E0E0'// Light grey tick labels },grid: {color:'rgba(200, 200, 200, 0.2)'// Subtle light grey grid lines [5, 7] } } } },// QuickChart.io specific option for chart background colorbackgroundColor:'#333333'// Dark grey background for the entire chart image [13] };const quickChartUrl ='https://quickchart.io/chart';try {const response =awaitfetch(quickChartUrl, {method:'POST',headers: {'Content-Type':'application/json', },body:JSON.stringify({chart: chartConfig,width:800,height:600,format:'png',// You can also set a background color here if not using chart.options.plugins.chartArea.backgroundColor// For QuickChart.io, the 'backgroundColor' parameter outside 'chart' config sets the canvas background [9]backgroundColor:'#282828'// Even darker background for the canvas itself (if different from chartArea) }), });if (!response.ok) {thrownewError(`QuickChart.io API error: ${response.statusText}`); }const imageBuffer =await response.buffer();return imageBuffer; } catch (error) {console.error('Error generating chart:', error);throw error; }}// Example usage (for testing purposes, if you run this in a Node.js environment):// (async () => {// try {// const imageBuffer = await generateVilleneuveRuntimesPlotDarkTheme();// require('fs').writeFileSync('villeneuve_runtimes_plot_dark.png', imageBuffer);// console.log('Dark theme plot image generated and saved as villeneuve_runtimes_plot_dark.png');// } catch (err) {// console.error('Failed to generate dark theme plot:', err);// }// })();
To use the bi-directional streaming API in Colab, you will buffer the audio stream. Define a handleServerContent and handleToolCall helper functions to handle the server content and tool calls, respectively. These will be used to process the text, code, tool calls, and html content returned by the model.
As each of the following examples only use a single prompt, also define a run helper to wrap the setup and prompt execution steps into a single function call. This helper takes a prompt, response modality and tools to use, and returns the response text or audio based on the modality.
First, execute a query without the Search tool to observe the model’s response to a time-sensitive query.
Note that the Multimodal Live API is a 2-way streaming API, but to simplify running in a notebook, each audio response is buffered and played once it has been fully streamed, so you will need to wait a few seconds before the response starts to play.
const _warn_fn =console.warn;// eslint-disable-next-line no-empty-function, @typescript-eslint/no-empty-functionconsole.warn= () => {};awaitrun("Who won the skateboarding gold medals in the 2024 olympics?", google.Modality.AUDIO);
Connection opened
Prompt:  Who won the skateboarding gold medals in the 2024 olympics?
Audio saved to ../assets/live/audio-1750287796747.wav
Audio saved to audio-1750287796747.wav
Session completed
Connection closed
Now re-run with the Search tool enabled.
awaitrun("Who won the skateboarding gold medals in the 2024 olympics?", google.Modality.AUDIO, [{ googleSearch: {} }]);
Connection opened
Prompt:  Who won the skateboarding gold medals in the 2024 olympics?
print(google_search.search(queries=["who won skateboarding gold medals 2024 Olympics"]))
Audio saved to ../assets/live/audio-1750287874770.wav
Audio saved to audio-1750287874770.wav
Session completed
Connection closed
Search with custom tools
In the Multimodal Live API, the Search tool can be used in conjunction with other tools, including function calls that you provide to the model.
In this example, you define a function set_climate that takes 2 parameters, mode (hot, cold, etc) and strength (0-10), and ask the model to set the climate control based on the live weather in the location you specify.
import { FunctionDeclaration, Tool, Type } from"@google/genai";const set_climate: FunctionDeclaration = { name:"set_climate", description:"Switches the local climate control equipment to the specified parameters.", parameters: { type: Type.OBJECT, properties: { mode: { type: Type.STRING, description:"Mode for the climate unit - whether to heat, cool or just blow air.", enum: ["hot","cold","fan","off"], }, strength: { type: Type.NUMBER, description:"Intensity of the climate to apply, 0-10 (0 is off, 10 is MAX).", minimum:0, maximum:10, }, }, required: ["mode","strength"], },};const custom_tools: Tool[] = [{ functionDeclarations: [set_climate] }, { googleSearch: {} }];awaitrun("Look up the weather in Paris using search and set my climate control appropriately.", google.Modality.AUDIO, custom_tools);
Connection opened
Prompt:  Look up the weather in Paris using search and set my climate control appropriately.
print(google_search.search(queries=["weather in Paris", "appropriate climate control for current Paris weather"]))