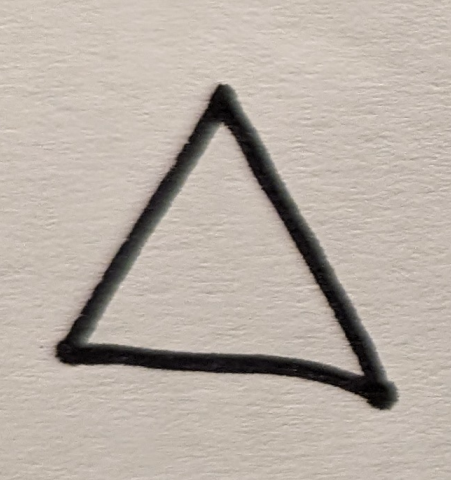
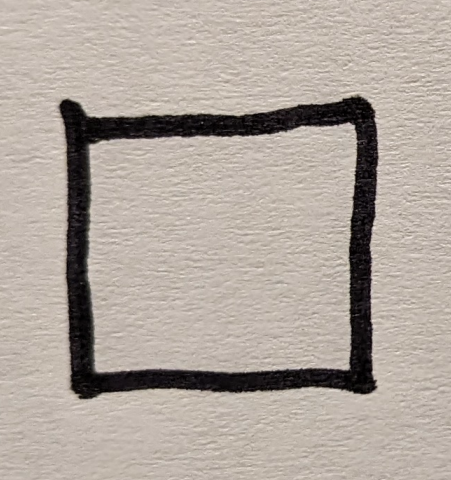
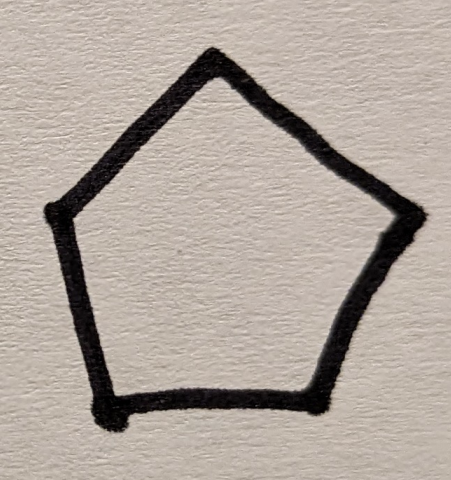
This notebook provides a quick code example showing how to use multiple images in the same prompt with the Gemini API. You’ll show the model a sequence of shapes (a triangle, a square, and a pentagon) and ask it to guess the shape that comes next.
You can create your API key using Google AI Studio with a single click.
Remember to treat your API key like a password. Don’t accidentally save it in a notebook or source file you later commit to GitHub. In this notebook we will be storing the API key in a .env file. You can also set it as an environment variable or use a secret manager.
Another option is to set the API key as an environment variable. You can do this in your terminal with the following command:
$ export GEMINI_API_KEY="<YOUR_API_KEY>"
Load the API key
To load the API key from the .env file, we will use the dotenv package. This package loads environment variables from a .env file into process.env.
$ npm install dotenv
Then, we can load the API key in our code:
const dotenv =require("dotenv") astypeofimport("dotenv");dotenv.config({ path:"../.env",});const GEMINI_API_KEY =process.env.GEMINI_API_KEY??"";if (!GEMINI_API_KEY) {thrownewError("GEMINI_API_KEY is not set in the environment variables");}console.log("GEMINI_API_KEY is set in the environment variables");
GEMINI_API_KEY is set in the environment variables
Note
In our particular case the .env is is one directory up from the notebook, hence we need to use ../ to go up one directory. If the .env file is in the same directory as the notebook, you can omit it altogether.
│
├── .env
└── examples
    └── Guess_the_shape.ipynb
Initialize SDK Client
With the new SDK, now you only need to initialize a client with you API key (or OAuth if using Vertex AI). The model is now set in each call.
const google =require("@google/genai") astypeofimport("@google/genai");const ai =new google.GoogleGenAI({ apiKey: GEMINI_API_KEY });
Select a model
Now select the model you want to use in this guide, either by selecting one in the list or writing it down. Keep in mind that some models, like the 2.5 ones are thinking models and thus take slightly more time to respond (cf. thinking notebook for more details and in particular learn how to switch the thiking off).
const prompt =` Look at this sequence of three shapes. What shape should come as the fourth shape? Explain your reasoning with detailed descriptions of the first shapes.`;
First Shape: The first shape is a triangle. It is a polygon with 3 sides and 3 vertices (corners).
Second Shape: The second shape is a square (or more generally, a quadrilateral). It is a polygon with 4 sides and 4 vertices.
Third Shape: The third shape is a pentagon. It is a polygon with 5 sides and 5 vertices.
Reasoning:
Observing the sequence, there’s a clear pattern: each subsequent shape is a polygon with one more side than the previous shape.
Shape 1 (Triangle) has 3 sides.
Shape 2 (Square) has 4 sides (3 + 1).
Shape 3 (Pentagon) has 5 sides (4 + 1).
Following this pattern, the fourth shape should be a polygon with 5 + 1 = 6 sides.
The Fourth Shape:
A polygon with 6 sides is known as a hexagon.
Therefore, the fourth shape in the sequence should be a hexagon.
Further reading
In this notebook, you included images directly in the prompt. This is fine for small images. If your prompts will exceed 20MB in size, you can use the Files API to upload your images (and other media types) in advance.